Managing Docker Logs with Elasticsearch and Kibana (dockerized, of course)


Are you using a Docker stack to run your services? Do you find it as uncomfortable as me to browse and analyze the logs?
Then you’ll want to consider a more streamlined approach to storing and browsing them.
In this article, we’ll look at setting up Elasticsearch and Kibana for that, plus Filebeats to deliver log files to Elasticsearch. We’ll expose Elasticsearch and Kibana using Nginx as a revere proxy.
We will run Elasticsearch, Kibana and Nginx as Docker containers, using Docker Compose for orchestration. Before we start, let’s look at which component does what in our stack:
Who does what?
- Docker runs our services in containers. The services log to the standard output
(e.g. using
console.login a Node application). - Filebeats polls the generated log files regularly to look for changes. Once new log lines are there, it sends them to Elasticsearch. There’ll be a Filebeats daemon running on each of your machines that runs a Docker daemon.
- Elasticsearch receives your log files and saves them in searchable incides.
- Kibana lets you search and browse the log files in a UI.
- All connections to Elasticsearch and Kibana are proxied through Nginx. We do that as Elasticsearch and Kibana offer no authentication in their open source packages, and Nginx will request a HTTP basic authentication from users. Also, we can use it as a load balancer later on.
Setting up Docker Compose
Let’s get started by setting up a Docker Compose file for our services. We’ll assume for this article
that all files are stored under /home/my-user/elk-stack. Adapt this path as required.
Save the following as docker-compose.yml inside your elk-stack folder:
version: '3.7'

volumes:
  elasticsearch:

networks:
  elk:

services:
  elasticsearch:
    image: elasticsearch:6.5.3
    volumes:
    - elasticsearch:/usr/share/elasticsearch/data
    networks:
      - elk
  kibana:
    image: kibana:6.5.3
    networks:
    - elk
  nginx_for_elk:
    image: nginx
    ports:
    - 9200:9200
    - 5601:5601
  networks:
    - elk
  volumes:
    - type: bind
      source: /home/my-user/elk-stack/nginx.conf
      target: /etc/nginx/nginx.conf
    - type: bind
      source: /home/my-user/elk-stack/.htpasswd
      target: /etc/nginx/.htpasswd
Let’s look at what exactly happens here:
- First, we define a volume to store the Elasticsearch data, and a Docker network that all our services are in. Like that, the services can access one another without exposing them to the outside world.
- Then, we define the Elasticsearch service. It mounts the volume defined above, and nothing much else happens here.
- Same for Kibana. Nothing special here, either.
- The configuration for Nginx has a bit more to it. We’ll expose its ports
9200and5601on our machine’s corresponding ports. So that’s the ports we can connect to later. Also, we mount two volumes: One for the Nginx configuration, the other for a.htpasswdfile containing usernames and passwords for authentication.
Nginx Configuration
We’ll now add the Nginx configuration file nginx.conf, placed next to your docker-compose.yml:
events {
  worker_connections  1024;
}

http {
  server {
    listen 9200;

    location / {
      proxy_pass      http://elasticsearch:9200/;
      auth_basic "Elasticsearch";
      auth_basic_user_file /etc/nginx/.htpasswd;
    }
}

  server {
    listen 5601;
      location / {
         proxy_pass      http://kibana:5601/;
         auth_basic "Kibana";
         auth_basic_user_file /etc/nginx/.htpasswd;
      }
  }
}
Nginx will listen to ports 9200 and 5601 (which matches our ports configuration in the Docker Compose
file). It forwards requests on port 9200 to Elasticsearch, and those on port 5601 to Kibana.
We’ll add a .htpasswd file that contains username/password combinations to access the locations.
Simply run
printf "USERNAME:$(openssl passwd -crypt PASSWORD)\n" > .htpasswd
inside your elk-stack folder.
Giving it a spin
You can now start up Elasticsearch, Kibana and Nginx:
docker-compose up
Try to open localhost:9200 in your browser. You should be greeted by a dialog that asks for
your username and password. Enter the username and password you stored in your .htpasswd.
Next, you should see a JSON like this, letting you know that Elasticsearch is up and running:
{
  "name" : "SMYsBcL",
  "cluster_name" : "docker-cluster",
  "cluster_uuid" : "iaGMUMoSSz-wSbS1pUnKIA",
  "version" : {
    "number" : "6.5.3",
    "build_flavor" : "default",
    "build_type" : "tar",
    "build_hash" : "159a78a",
    "build_date" : "2018-12-06T20:11:28.826501Z",
    "build_snapshot" : false,
    "lucene_version" : "7.5.0",
    "minimum_wire_compatibility_version" : "5.6.0",
    "minimum_index_compatibility_version" : "5.0.0"
  },
  "tagline" : "You Know, for Search"
}
Same for localhost:5601: It should open up a fresh Kibana instance.
Configure Filebeat: sending Docker logs to Elasticsearch
Now that we have Elasticsearch and Kibana running, you’ll want to push actual Docker logs into Elasticsearch.
We’ll do that using Filebeat. Filebeat will run on every Docker host and collect all Docker logs by observing /var/lib/docker/containers/*/*.log.
So first, we’ll need to install Filebeat. Check out the official documentation for the details.
Now, let’s set up a basic Filebeat configuration (usually in /etc/filebeat/filebeat.yml):
filebeat.inputs:
  - type: docker
    containers.ids: '*'
    processors:
      - add_docker_metadata: ~

output.elasticsearch:
hosts: ["http://127.0.0.1:9200"]
username: "USERNAME"
password: "PASSWORD"
What’s happening? We’re asking Filebeat to read logs for all Docker containers and enrich the log data with Docker metadata. Like that, data like the Docker image ID are available in the logs.
Then Filebeat will forward the logs to Elasticsearch. Make sure to configure the username and password
fields according to what you wrote into .htpasswd earlier.
Start Filebeat
Now (re-)start Filebeat. Under Linux with SystemD, use systemctl restart filebeat.
Check out the logs under /var/log/filebeat/filebeat to make sure everything is running smoothly.
Configure Kibana to view logs
To make sure you can discover, browse and view your logs, you need to let Kibana know which Elasticsearch indices to search through: All your Filebeats indices.
To do so, open up Kibana under http://localhost:5601. Click “Management” in the menu, then
under the “Kibana” entry, click “Index Patterns”. Create a new index pattern called filebeats*:
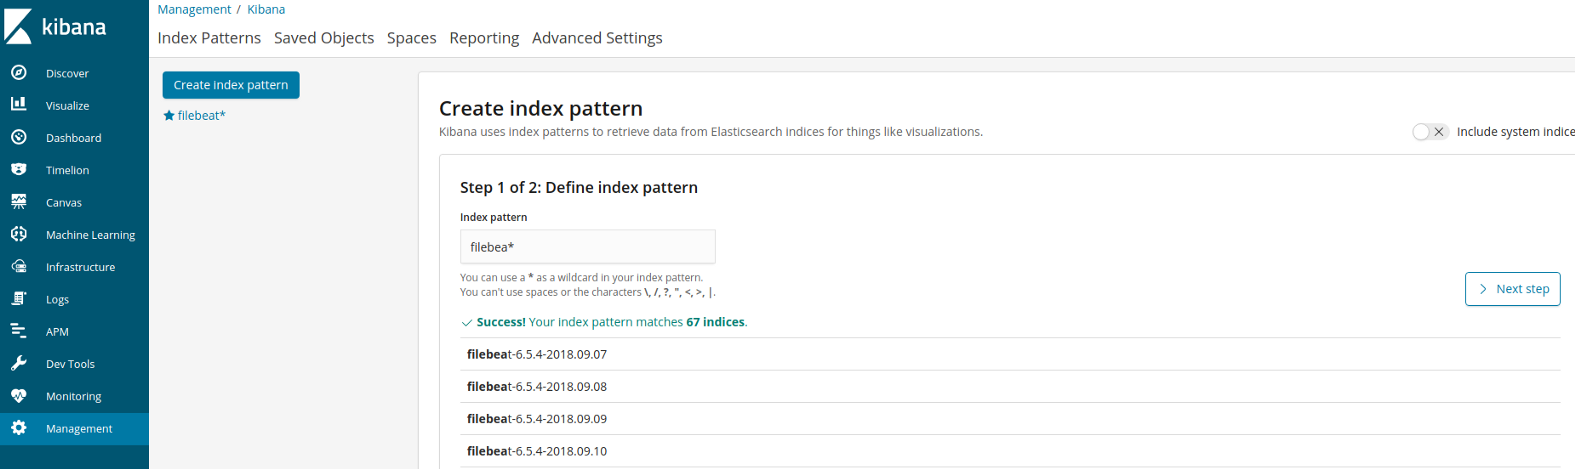
Click through the next steps and save the index pattern.
When you now click on Logs, you should see your Docker logs coming in.
Rolling it out
In order to roll this solution out, you can take the following steps:
- Deploy the stack we’ve defined here on a server. For production use, make sure you put a reverse proxy in front of the stack’s Nginx and use SSL for transport encryption.
- Launch Filebeat on each Docker host. Configure it to point to your reverse proxy.
- Make backups of your Elasticsearch volume.