Exploring Devcontainer in VS Code


Container and Images changed the way we build, ship and run our code tremendously.
Some of their benefits include less overhead in system resources, increased portability to different operating systems and more consistent operation as they run the same - regardless of their deployment.
Let's see how we can use the aforementioned advantages to leverage our development environments with one of VS Code's most recent features.
Prerequisites
To follow along you should have VS Code or VS Code Insiders as well as Docker installed and running on your machine.
Additionally the Remote - Containers extension needs to be installed.
Once the aforementioned Remote - Containers is successfully installed, a small green icon should appear in the lower left corner of your editor:

Taking a look at the examples
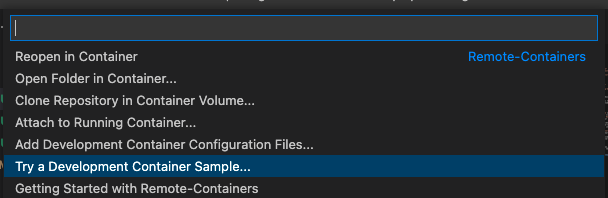
As the requirements are now out of the way, let's get into the meat and bones by taking a first look on the official examples.
Clicking on the extension icon opens up the Command Palette where we can choose to "Try a Development Container Sample...":
...which let's us once again choose between several programming languages:
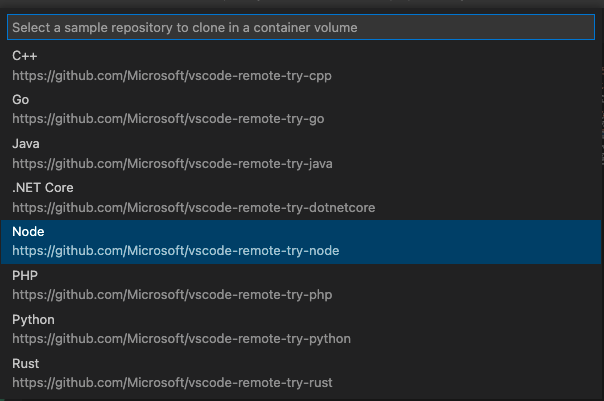
Selecting Node launches a new instance of your editor with the following content:
.devcontainer
  devcontainer.json
  Dockerfile
.vscode
  launch.json
node_modules
  [...node_modules]
.eslintrc.json
.gitignore
LICENSE
package.json
README.MD
server.js
yarn.lock
Let's inspect the relevant files and build the tension up!
package.json
{
  "name": "docker_web_app",
  "version": "1.0.0",
  "description": "Node.js on Docker",
  "author": "First Last <first.last@example.com>",
  "main": "server.js",
  "private": true,
  "scripts": {
    "start": "node server.js"
  },
  "dependencies": {
    "express": "^4.16.1"
  }
}
Looks pretty standard, right? We have express as a dependecy and a start command to spin it up.
server.js
/*---------------------------------------------------------------------------------------------
 *  Copyright (c) Microsoft Corporation. All rights reserved.
 *  Licensed under the MIT License. See License.txt in the project root for license information.
 *--------------------------------------------------------------------------------------------*/

'use strict';

const express = require('express');

// Constants
const PORT = 3000;
const HOST = '0.0.0.0';

// App
const app = express();
app.get('/', (req, res) => {
	res.send('Hello remote world!\n');
});

app.listen(PORT, HOST);
console.log(`Running on http://${HOST}:${PORT}`);
Here we have a dead simple express server, which will simply return Hello remote world to anyone accessing http://localhost:3000. Easy, let's continue?
.devcontainer/Dockerfile
# See here for image contents: https://github.com/microsoft/vscode-dev-containers/tree/v0.195.0/containers/javascript-node/.devcontainer/base.Dockerfile
# [Choice] Node.js version (use -bullseye variants on local arm64/Apple Silicon): 16, 14, 12, 16-bullseye, 14-bullseye, 12-bullseye, 16-buster, 14-buster, 12-buster
ARG VARIANT=16-bullseye
FROM mcr.microsoft.com/vscode/devcontainers/javascript-node:0-${VARIANT}

# [Optional] Uncomment this section to install additional OS packages.
# RUN apt-get update && export DEBIAN_FRONTEND=noninteractive \
#     && apt-get -y install --no-install-recommends <your-package-list-here>

# [Optional] Uncomment if you want to install an additional version of node using nvm
# ARG EXTRA_NODE_VERSION=10
# RUN su node -c "umask 0002 && ./usr/local/share/nvm/nvm.sh && nvm install ${EXTRA_NODE_VERSION}"

# [Optional] Uncomment if you want to install more global node modules
# RUN su node -c "npm install -g <your-package-list-here>"
Per default the Dockerfile only contains ARG and FROM to get the base image off of one Microsofts provided ones.
Also not that exciting, huh?
.devcontainer/devcontainer.json
// For format details, see https://aka.ms/devcontainer.json. For config options, see the README at:
// https://github.com/microsoft/vscode-dev-containers/tree/v0.195.0/containers/javascript-node
{
	"name": "Node.js",
	"build": {
		"dockerfile": "Dockerfile",
		// Update 'VARIANT' to pick a Node version: 16, 14, 12.
		// Append -bullseye or -buster to pin to an OS version.
		// Use -bullseye variants on local arm64/Apple Silicon.
		"args": { "VARIANT": "16-bullseye" }
	},

	// Configure tool-specific properties.
	"customizations": {
		// Configure properties specific to VS Code.
		"vscode": {
			// Set *default* container specific settings.json values on container create.
			"settings": {},

			// Add the IDs of extensions you want installed when the container is created.
			"extensions": [
				"dbaeumer.vscode-eslint"
			]
		}
	},

	// Use 'forwardPorts' to make a list of ports inside the container available locally.
	// "forwardPorts": [3000],

	// Use 'portsAttributes' to set default properties for specific forwarded ports. More info: https://code.visualstudio.com/docs/remote/devcontainerjson-reference.
	"portsAttributes": {
		"3000": {
			"label": "Hello Remote World",
			"onAutoForward": "notify"
		}
	},

	// Use 'otherPortsAttributes' to configure any ports that aren't configured using 'portsAttributes'.
	// "otherPortsAttributes": {
	// 		"onAutoForward": "silent"
	// },

	// Use 'postCreateCommand' to run commands after the container is created.
	"postCreateCommand": "yarn install",

	// Comment out connect as root instead. More info: https://aka.ms/vscode-remote/containers/non-root.
	"remoteUser": "node"
}
This is the most interesting file for us so far!
build.dockerfile contains a link to our aforementioned Dockerfile.
build.args could contain a set of key-value pairs which also contains our used VARIANT.
customizations.vscode is a neat and powerful way to prepare your Dev Container with all our loved and needed extensions.
This example comes with eslint pre-installed, but it could be anything.
This is especially helpful if you have extensions that you only need on specific workspaces and/or would conflict each other.
postCreateCommand let's us run commands such as yarn install to already install all the dependencies upon container creation.
Let's run the example
As we already have everything setup for us, it's just a matter of opening VS Code's integrated terminal in the Dev Container.
You can do so by using the shortcut (⇧⌘P on macOS or Ctrl+Shift+P on Windows and Linux) to open the Command Palette, then typing and selecting "Toggle Terminal" once open.
Running yarn start spins up the small app and exposes the port automatically, which let's us access http://localhost:3000 again, yay!
But how does it work?
Running docker ps or opening Docker Desktop shows the created and running container, which is named vsc-<project-name>-<id>.
The source code is copied, cloned or mounted as a Volume to the Dev Container.
The defined Extensions are installed and run - while also having full access to tools, platform and file system, which enables full IntelliSense, code navigation and debugging.
The ports are either exposed via .devcontainer.json configuration or via auto-forwarding.
Adding a development container to an existing project
Whilst writing this article, I'm taking the chance to create a Dev Container for our HipSquare Blog!
Setting it up is incredibly easy, so bear with me:
- Open up the
Remote - ContainersCommand Palette - Choose "Add Development Container Configuration Files..."
- Choose "Node.js"
- Choose any version
- Choose no additional features
- Hit "ok"
...And that's it!
We now have our new, shiny .devcontainer dir available!
As this blog runs with NextJS and Tailwind, we want to at least have some support for Tailwind, so let's add the extension to the mix:
{
	"customizations": {
		"vscode": {
			"extensions": [
				"dbaeumer.vscode-eslint",
				"bradlc.vscode-tailwindcss" // <-- we only have to add that!
			]
		}
	}
}
Now that's done, let's reopen the Remote - Containers' Command Palette and select "Reopen in Container".
Once VS Code has restarted we're ready to roll in a containerized dev environment, woooh!
Wrap up
We at HipSquare are super excited about the introduction of Dev Container as it's making onboarding and setting up a proper development environment easier than ever.
For further reading please also have a look on the official documentation.
It's super easy to follow along, while also giving a ton of insight on how Dev Container actually work.